Developer Guide
The aim of this guide is to help the reader to understand how the system and components of Fitbot is designed, implemented and tested. In the same time, this developer guide also serves to help developers who are interested in understanding the architecture of Fitbot and some design considerations. Don’t know about Fitbot? Click here to find more.
Content page
- Architecture
- Data Component
- Ui Component
- Logic Component
- Storage Component
- State Component
- Implementation
- Product Scope
- User Stories
- Non-functional Requirements
- Glossary
- Instruction for Manual Testing
Acknowledgements
Firstly, we would like to acknowledge AddressBook Level-2 as we adapted its utility methods for
testing in one of our classes, ParserManager.
We would also like to acknowledge AddressBook Level-3 for providing many useful insights on how to write and structure our code in
Object-Oriented Programming fashion.
Design
Architecture
Main class is the component that interacts with all the necessary classes.
The Main class consists of the few components as shown below:
Ui: Facilitates interaction between user and applicationLogic: Parses commands and execute them respectivelyData: Allows users to perform Create, Read, Update, Delete (CRUD) operations on the data in the applicationStorage: Stores all data in the application. Saves a copy of data in relevant files. Data will be retrieved from storage upon starting of application.State: Helps the user to restore or create profile data.
Upon launching of application:
- The application will check if there are files that are already stored in the respective folder. If there is such files, the contents of the files will be loaded to the data section of the application. Instances of profile, data(e.g. FoodList, ExerciseList, FutureExerciseList, ItemBank) and storage will be created.
- If there is no such files, the files will be created.
Upon exiting of application:
- The application will save all data into the files created. All instance of components will be cleared automatically.
Class diagram of Main
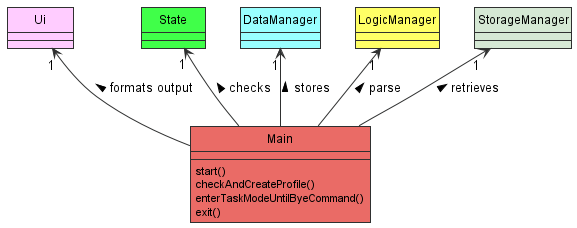
When Fitbot is being started, the above instances (Ui,State, LogicManager,DataManager and StorageManager)
are being created in the main class. The main class will require 1 of each instance for the application to function.
- Main class start of by running the
start()function which loads all information using StorageManager class to the Profile, FoodList, ExerciseList,ItemBank(foodBank, exerciseBank). -Next main class will check if user contains the profile using thecheckAndCreateProfile(). If user does not have a profile, the application will assist user to create a profile by prompting questions. -After setting up/ ensuring that user have a profile, the main program will enterenterTaskModeUntlByeCommand()for user to interact with the application - Once user has keyed in the command
bye, the main program will exit out of theenterTaskModeUntlByeCommand()and run theexit()command to exit the application.
Data Component
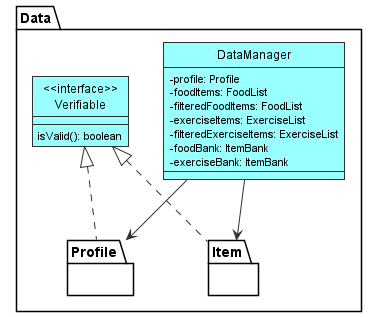
The Data component is responsible to perform operations such as data modification and query in the code.
In Data component, it consists of:
DataManagerclass which is responsible to help interaction between classes inLogicComponent and classes inDataComponent.Profilepackage which is responsible to any manipulation and modification of data forProfile.Itempackage which is responsible to any manipulation and modification of data forItemsuch asFoodandExercise.Verifiableinterface which is responsible to check data validity in storage files.
Data Component (Profile)
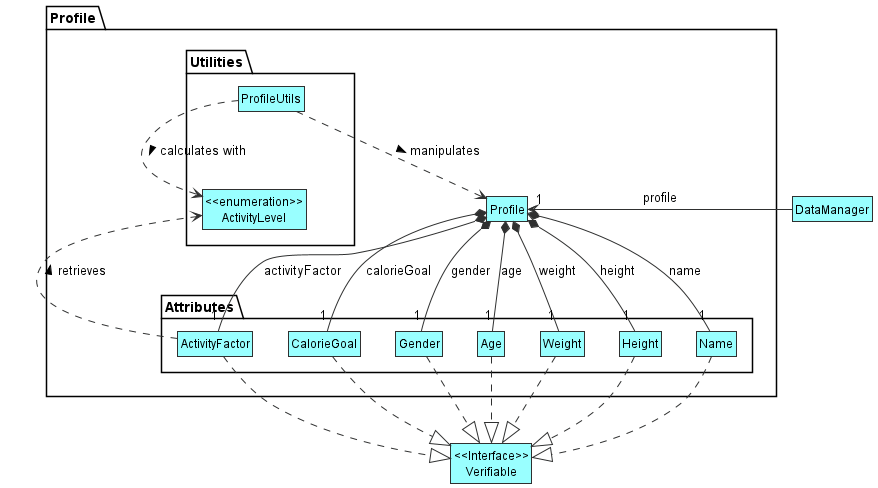
A Profile class has various attributes such as Name, Height, Weight, Gender, Age, CalorieGoal and ActivityFactor
-
Using these attributes it is able to calculate an estimated Basal Metabolic Rate (BMR) using the Harris-Benedict Equation based on your activity levels. Therefore, while calculating your net calories for the day, your BMR is factored in to give you an estimated calculation of your net calorie.
-
All the attributes implement a
Verifiableinterface to enable us to check if the attributes are valid. This is important for the setting up of profile or the loading of profile from storage to ensure data integrity of the user’s attributes.
The ProfileUtils class is used in performing calculations (such as BMR or BMI) with the various attributes of the Profile class.
Data Component (Item)
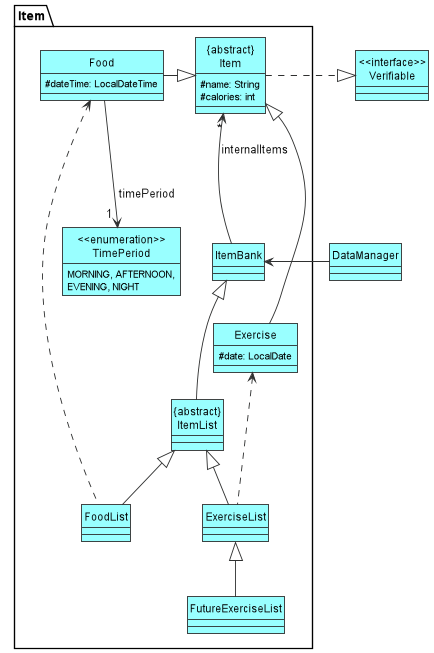
Above is a high-level class diagram for all the classes in Item package. In Item package, it has
two different class hierarchy, one is ItemBank, and one is Item.
The main purpose of having ItemBank and Item classes is to allow user to perform writing, reading, editing and deleting operations in the program.
ItemBank Class Hierarchy
ItemBankis the highest superclass that contains one attribute calledinternalItemswhich is an array list ofItem.ItemListbeing the subclass ofItemBankand superclass ofFoodListandExerciseList, which inherits all the methods available fromItemBank, with additional methods that form a dependency onItemclass.FoodListandExerciseListare subclasses that inherit all the methods available fromItemList, while each of them also contains more methods that form a dependency onFoodclass andExerciseclass respectively.FutureExerciseListis a subclass that inherits all the methods available fromExerciseListand contains other methods that form a dependency onExerciseclass.
As shown in the diagram above, DataManager class has association with ItemBank. This also implies that it has association with
all the subclasses that inherits ItemBank.
Item Class Hierarchy
- An
Itemclass contains two attributes,namewhich represents the name of the item, andcalorieswhich represents the calorie intake/burnt from the item. FoodandExerciseare the only two subclasses that inherit theItemclass.Foodclass has two extra attributes calleddateTimeandtimePeriod, the former stores the consumed food date and time, while the latter compute the time period (only value such asMORNING,AFTERNOON,EVENINGandNIGHTas shown in the enumeration classTimePeriod) of the food consumed time. Note that thetimePeriodvalue must present when aFoodobject is created.Exerciseclass has one extra attribute calleddatewhich stores the date of the exercise taken.
As shown in the diagram above, the Item class implements interface Verifiable. This interface contains method to check the validity for the items
in the storage files. If the data in storage file is invalid, that item will not be loaded to the program. Note that since the superclass
Item implements Verifiable, its subclasses Food and Exercise also implement the interface.
Abstract classes of Items and ItemLists acts as an agent for meaningful subclasses of Food and Exercise to inherit its attributes and functionality for a more concise use-case.
Ui Component
The purpose of Ui component is to interact with the user. It reads in input from the user and prints messages on the
console. Below shows a sequence diagram of how Ui component interacts with the rest of the application.
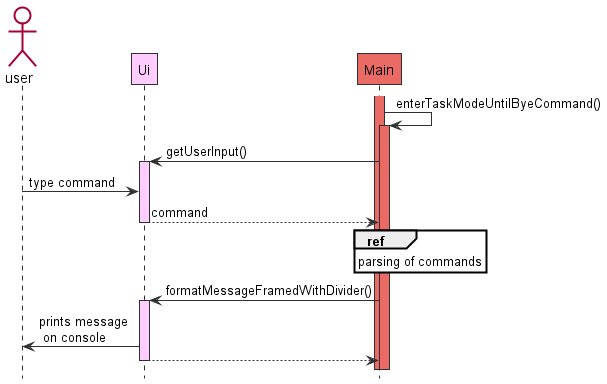
Step 1: The main program starts off with the run() method (method not shown but the activation bar is present), and the
run() method self invokes itself by calling enterTaskModeUntilByeCommand(),
Step 2: In this method, the Main class will prompt for user input using getUserInput().
Step 3: Once the Ui instance received user input, the Main class will process the data. This process will be elaborated in Parsing of Commands under Implementation.
Step 4: After processing the data, no matter success or fail, the Main class will tap on Ui instance again to print
message on the console using formatMessageFramedWithDivider().
Note: The Main class has 2 activation bars due to the run() method which will then activate
enterTaskModeUntilByeCommand(). In the example above, it is assumed that bye command is not used as example.
Logic Component
The Logic component is responsible for making sense of user input.
Below is a high level class diagram of the Logic component, which shows how it interacts with other components
like Main, Storage and Data.
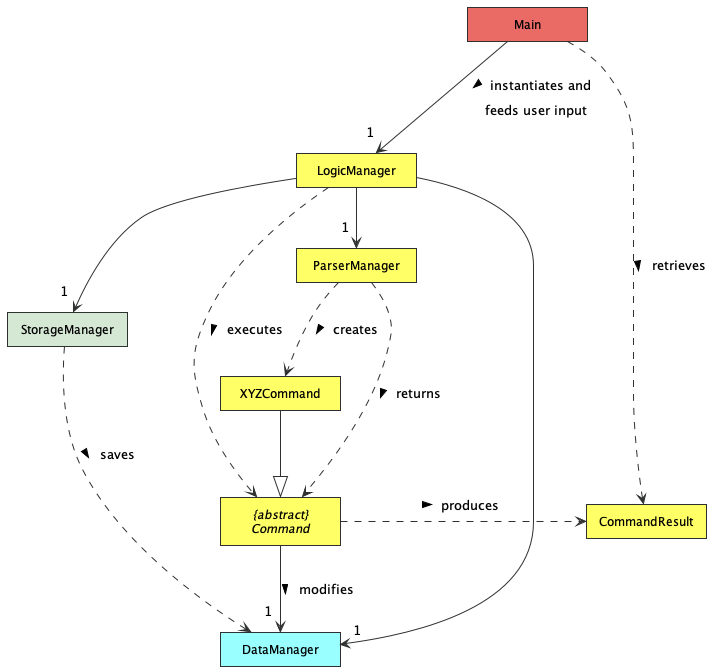
The general workflow of the Logic component is as follows:
- When the program first starts,
MaininstantiatesLogicManagerand initialises it withStorageManagerandDataManager. At the same time,ParserManageris also instantiated withinLogicManager. - Whenever
Mainreceives user input, it feeds this user input to theLogicManager. LogicManagerthen calls onParserManagerto parse the user input.- The
ParserManagerparses the user input and creates aCommandobject.- More specifically, it creates a
XYZCommandobject, whereXYZis a placeholder for the specific command type, e.gAddFoodCommand,UpdateProfileCommand, etc. XYZCommandclass inherits from the abstract classCommand, which is used to represent all executable commands in the application.
- More specifically, it creates a
ParserManagerreturns theCommandobject toLogicManager, which then executes theCommand.- During execution,
Commandwill perform data manipulation onDataManager. - After execution, all
Commandobjects stores the result of the execution in aCommandResultobject. ThisCommandResultobject is then returned toLogicManager. - Depending on the type of
Commandbeing executed which affects the type of data that has been manipulated,LogicManagerwill call uponStorageManagerto save the affected data to the file system. - Finally,
CommandResultis returned toMain.
Here is a more detailed class diagram illustrating the classes within the Logic component.
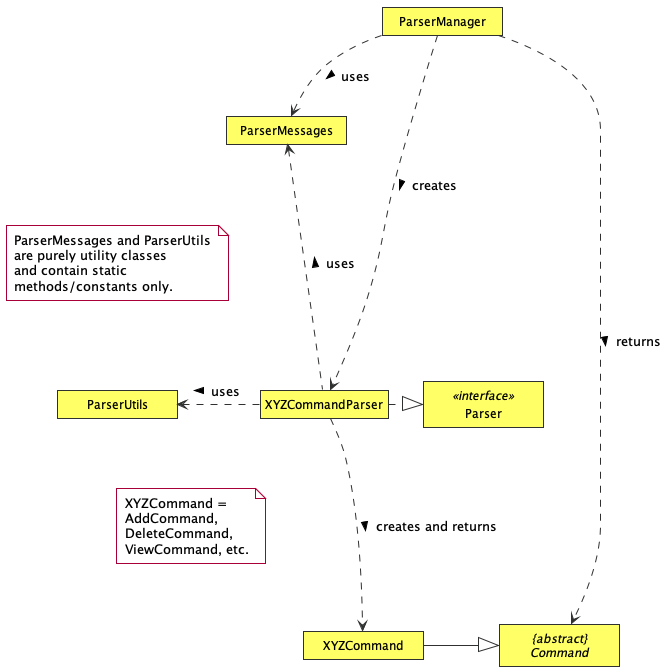
Taking a closer look into the parsing process, the ParserManager actually does not do most of the parsing itself. This is how the parsing process works:
ParserManagercreatesXYZCommandParser, which is then responsible for creating the specificXYZCommand.- All
XYZCommandParserclasses implement the interfaceParser, which dictates that they are able to parse user inputs. - They also make use of utility methods stored in
ParserUtilsto extract all the parameters relevant to the command, and constants inParserMessagesto format the desired output.
- All
- After parsing the input,
XYZCommandParserreturnsXYZCommandtoParserManager, which then returns the sameXYZCommandtoLogicManager.
Storage component
This is a (partial) class diagram that represents the Storage component.
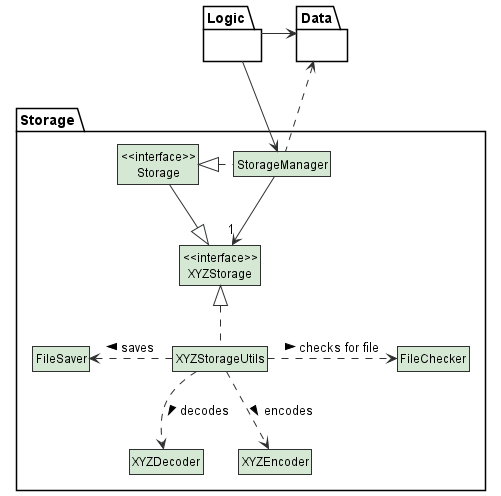
- Firstly,
Storageinherits each of theXYZStorageinterfaces. This ensures theStorageAPI has the relevant load and save functions of the various storages. StorageManagerthen implements theStorageAPI that contains the relevant functionalities and instantiatesXYZStorageusing the respectiveXYZStorageUtils.- Each of the
XYZStorageUtilsutilizes the general classes ofFileCheckerto create/check for their files andFileSaverto write to their respective files. XYZStorageUtilsalso usesXYZDecoderto decode files from the saved .txt file and aXYZEncoderto encode items into the saved file.
The StorageManager component loads and saves:
- your profile: name, height, weight, gender, age, calorie goal and activity factor
- list of exercises done: including date performed
- list of food consumed: including date and time of consumption
- upcoming exercises: recurring exercises that are scheduled in the future
- food and exercise banks: names and calories of relevant item
This way of design ensures that each class has the correct methods to perform its capabilities.
State Component
Create Profile (StartState)
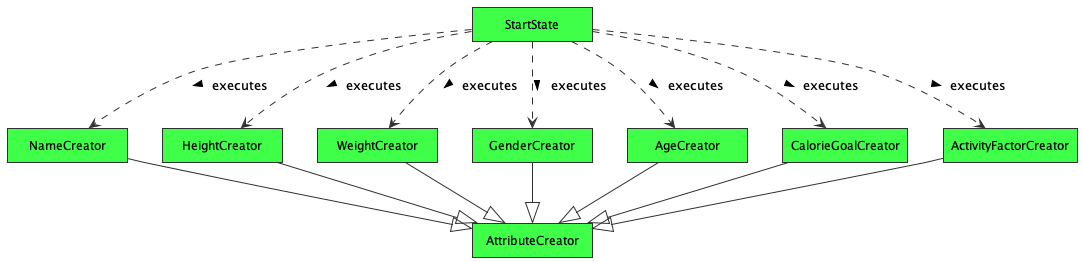
- When the
StartStatemethod is being called, it instantiated and execute methods in the 7 classes, which areNameCreator,HeightCreator,WeightCreator,GenderCreator,AgeCreator,CalorieGoalCreatorandActivityFactorCreator. - The above Classes instantiated by
StartStateare inherited fromAttributeCreatorclass. These profile attributes are inherited fromAttributeCreatorto conform DRY principle, by extracting out common methods.
Implementation
This section describes some noteworthy details on how certain features are implemented and some design considerations.
❗️ Note: Due to limitations of PlantUML, the lifeline in sequence diagrams does not end at the destroy marker (X) as it should, but reaches the end of the diagram instead.
Parsing of Commands
The sequence diagram below models the interactions between the different classes within the Logic component. This particular case illustrates how a user input add f/potato c/20 is parsed and process to execute the appropriate actions.
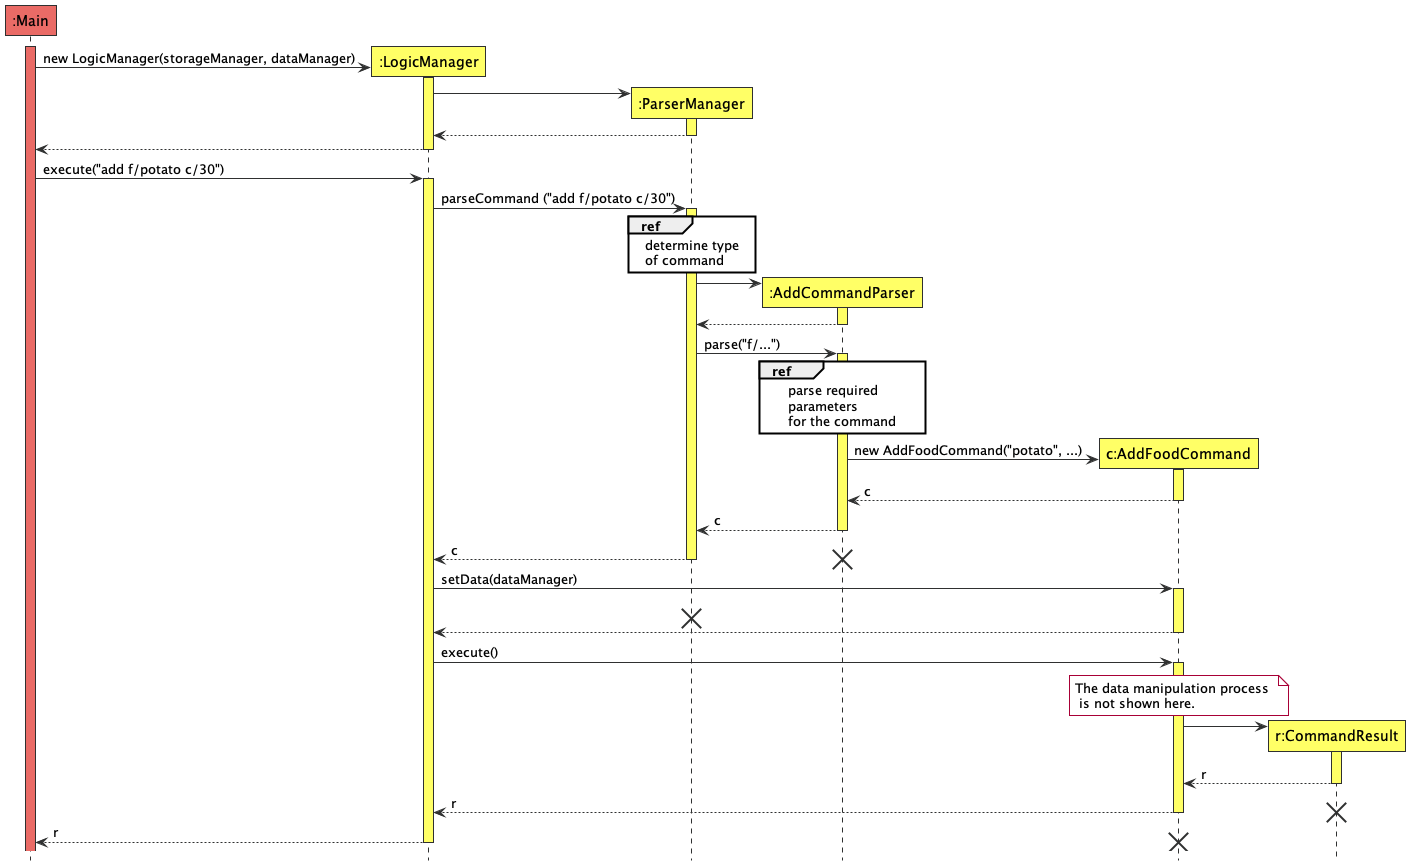
Step 1: When the program first starts, Main instantiates LogicManager, and initialises it with the objects storageManager and dataManager. This is so that LogicManager has access to the storage and data components.
Step 2: LogicManager then instantiates a ParserManager object. This is the class where all the parsing of commands will occur.
Step 3: In the case where Main receives the user input add f/potato c/30, Main will call the method execute from LogicManager, and provides the user input as the argument.
Step 4: LogicManager then calls the parseCommand method from ParserManager. Now, ParserManager will start to parse the user input.
Step 5: Firstly, ParserManager has to determine the type of Command it is trying to parse. The details of this process is shown in the sequence diagram below.
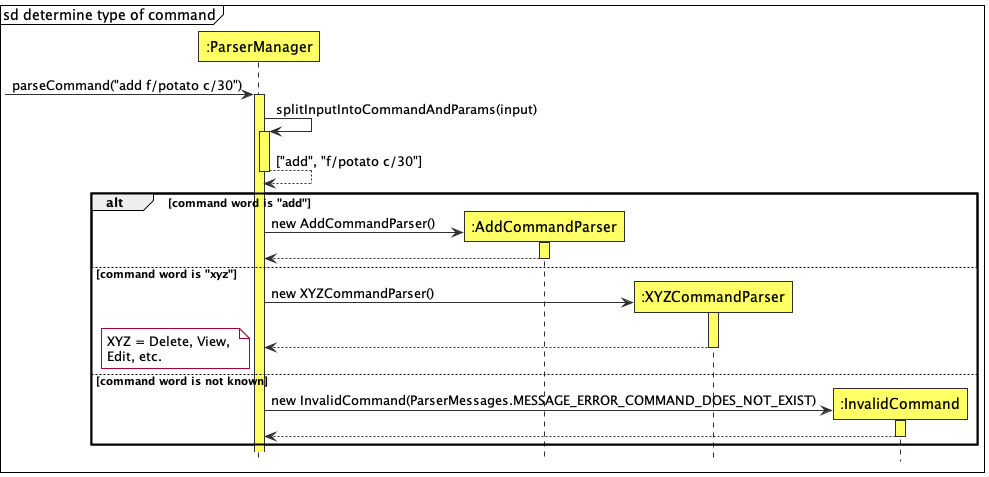
Step 6: As seen in the above diagram, ParserManager first splits the input into command word and the remaining parameters. In this case, the command word is add, and the parameters are f/potato c/30.
Step 7: Depending on the command word, ParserManager will then instantiate the appropriate XYZCommandParser. In this case, since the command word is add, an AddCommandParser object is created.
However, if the command word is not known to the program (i.e. is not equal to any XYZ specified), an InvalidCommand will be created and returned immediately.
Step 8: After the appropriate AddCommandParser is created, ParserManager will then call the method parse on the AddCommandParser. AddCommandParser will then start to parse all the required parameters specific to the AddCommand. This process is explained in detail in the below sequence diagram.
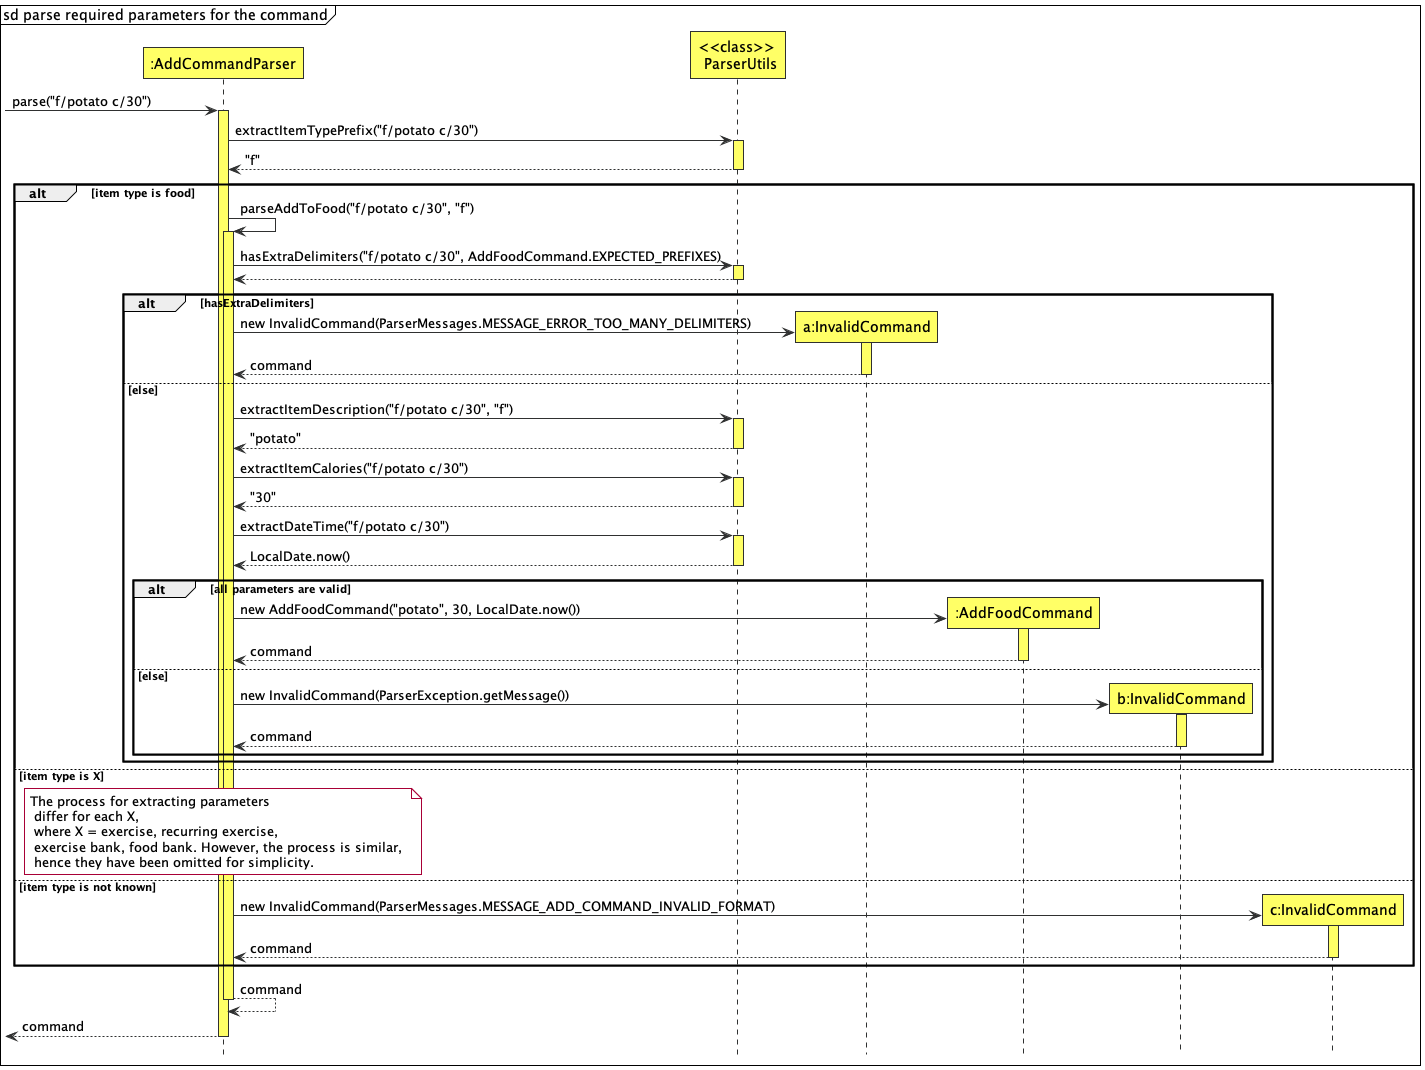
Step 9: Since the AddCommand can be called for different items in the program, such as FoodList, ExerciseList, etc., AddCommandParser will first call the extractItemTypePrefix method from ParserUtils.
Note that all methods from ParserUtils are static as ParserUtils is purely a utility class. This method will extract the item type prefix, which is the first parameter provided after the command word. In this case, f is extracted and returned to AddCommandParser.
If at this point the item type prefix extracted is not known to the program, an InvalidCommand will be created and returned immediately.
Step 10: After determining that the AddCommand is to be performed on the FoodList, AddCommandParser will call its own method, parseAddToFood.
Step 11: Inside the method parseAddToFood, AddCommandParser will first call the method hasExtraDelimiters from ParserUtils to determine if there are extra / characters in the input, which would make it invalid. If yes, an InvalidCommand will be created and returned immediately.
Step 12: Then, AddCommandParser will call the relevant methods from ParserUtils to extract specific parameters. In this case, the methods extractItemDescription, extractItemCalories and extractDateTime are called.
Step 13: If all the parameters extracted are valid, then AddCommandParser will instantiate and initialise an AddFoodCommand object with the extracted details. Else, if any of the parameters are invalid, an InvalidCommand would be created and returned immediately.
Step 14: The instantiated Command object is then returned to ParserManager, which then returns it to LogicManager. In this case, AddFoodCommand is returned.
Step 15: LogicManager then calls the method setData on AddFoodCommand to provide it with the program’s data.
Step 16: LogicManager then calls the method execute on AddFoodCommand to perform the data manipulation process. For example, in this case, a food item will be added to the FoodList. The details of this process is not shown here, but can be seen in this section.
Step 17: Finally, AddFoodCommand instantiates a CommandResult object representing the result of the execution. This CommandResult is then returned to LogicManager, which then returns it to Main.
Add a Food Item Feature
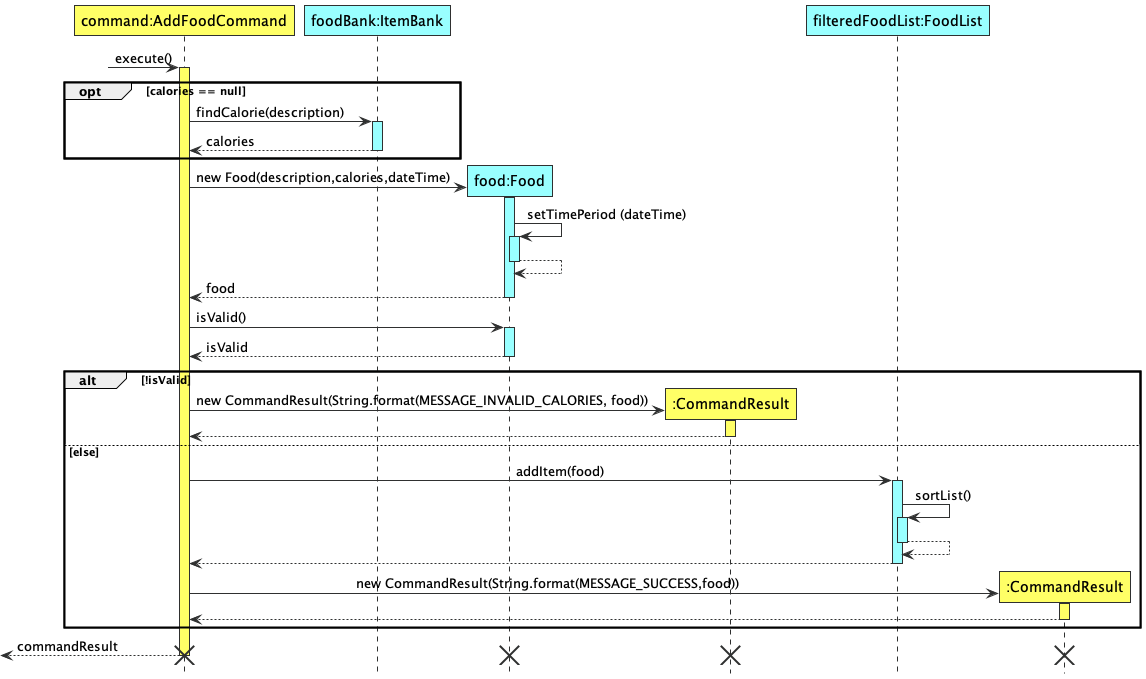
The purpose of this feature is to allow the user to add food item to the food list. The above diagram shown is the sequence diagram of the process of adding the food item.
When the user gives an input, ParserManager from the Logic component will try to read the input, and then call the correct
command. In this case we assume that the correct format of Add Food input is given and the AddFoodCommand has already been
called and created.
Step 1: When the execute method in the AddFoodCommand is being called, it will first check that if the calories is equal to null. If this
condition is true, meaning that the user does not provide the calorie value of the food item, thus the item is expected to be found in the FoodBank.
Step 2: Once the calorie value is determined, whether from FoodBank or user input, the AddFoodCommand then call the constructor
of the Food. When the Food constructor is called, it will perform a self-invocationsetTimePeriod to set the enum value timePeriod
of the Food. After that, it returns the Food object to the AddFoodCommand.
Step 3: The newly created Food object food is checked if it has a valid calorie value by calling the method isValid() in Food class. This
method returns a boolean result isValid to AddFoodCommand. Then the program will enter an alt block which determines whether the food object
should be added to the foodList.
Step 4a: If the calorie value is invalid, the boolean isValid will be false. When this condition is satisfied, it will enter the first
alternative path, which then creates a CommandResult class object that contains the message to inform the user that the calorie value
is incorrect. In this path, no food item is added to the foodList. This CommandResult object is returned to the AddFoodCommand.
Step 4b: If the calorie value is valid, the boolean isValid is true, the AddFoodCommand will call the method addItem from the FoodList object, which performs the add food operation in the
Food List. After the new Food Item is added, it will perform a self-invocation sortList to sort the FoodList according to
the date and time of all the food items inside the list. Since the addItem method is void type, nothing is returned to AddFoodCommand.
After the addItem method is executed without giving any error, the AddFoodCommand then calls a CommandResult object that contains the message indicating the command is executed
successfully. This CommandResult object is returned to the AddFoodCommand.
Step 5: Once the CommandResult class object is returned, the AddFoodCommand then return this commandResult to the class that calls it.
At this stage, the AddFoodCommand execution is successfully ended.
After all the steps are done, the objects of class AddFoodCommand, Food and CommandResult are no longer referenced and hence get removed
by the Garbage Collector in Java. However ,the lifeline of foodBank and foodList objects are still continuing because they
are created in DataManager class and have the potential to get referenced by other commands call such as add, delete, view and edit.
One may also observe that the lifeline does not end even though the object is deleted and no longer be referenced. This problem is due to the flaw of the drawing tool, PlantUml used. For a more accurate sequence diagram, the lifeline should end immediately once the object is no longer referenced.
Design considerations:
The current data structure used in FoodList is Array List. The rationale of choosing an array list implementation is because
it supports resizability and random accessibility. However, the drawback of such an array list is that sorting requires
O(n2), which slows down the code efficiency. In the future increment, alternative data structures such as
Priority Queue and Min Heap can be implemented to achieve O(logn) addition and they are
naturally sorted and thus no additional sorting required.
The same reasoning for the class ItemBank, which is the superclass of FoodList and ExerciseList,the current implementation
data structure is also an Array List. In the future increment, since the ItemBank need to perform query
operation frequently and the items inside need to be sorted alphabetically, the data structure of the attribute will be changed
to TreeMap to achieve O(logn) query time.
Add a Recurring Exercise Feature
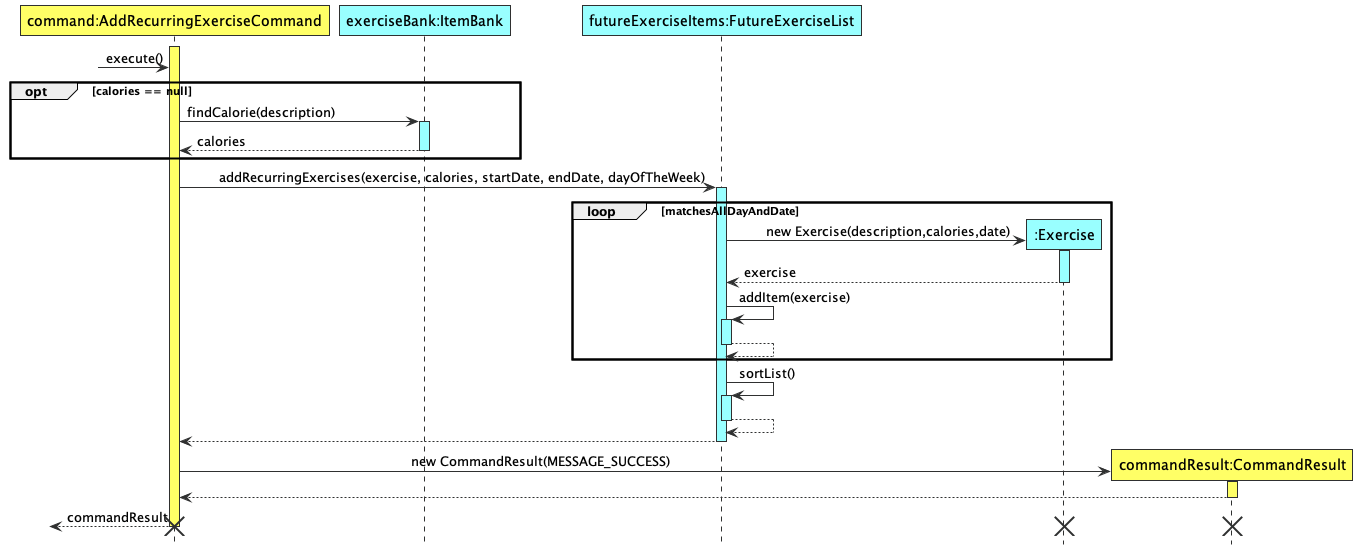
The purpose of this feature is to allow the user to add recurring exercises to the future exercise list. The above diagram is the sequence diagram of adding recurring exercises to the future exercise list, assuming that the user input satisfies the restrictions and does not cause any errors to be thrown.
Step 1: The ParserManager from the Logic component parses the input given by the user and calls the execute method in
AddRecurringExerciseCommand. The condition calories == null is checked to see if the user input any calories for
the recurring exercise. If it is true, it means that no calories input is detected and the method
findCalories in class ItemBank is called, and it will return an int value of calories.
Step 2: Within execute method, addRecurringItem method in FutureExerciseList is also called. This method will
iteratively call the constructor for Exercise class and add the exercises into FutureExerciseList via the self-invocation
addItem method. This iteration will end when all exercises on dayOfTheWeek between startDate and endDate are added.
Step 3: After addRecurringExercises method is executed, AddRecurringExerciseCommand calls a CommandResult object.
This object outputs a message and AddRecurringExerciseCommand will return commandResult, indicating that
AddRecurringExerciseCommand is successfully executed and ended.
Loading of Data On StartUp
There are many files that are used for our current implementation. Therefore, since they are similar in behaviour and function, we will only be looking at the loading of the Profile component on the starting up of Fitbot.
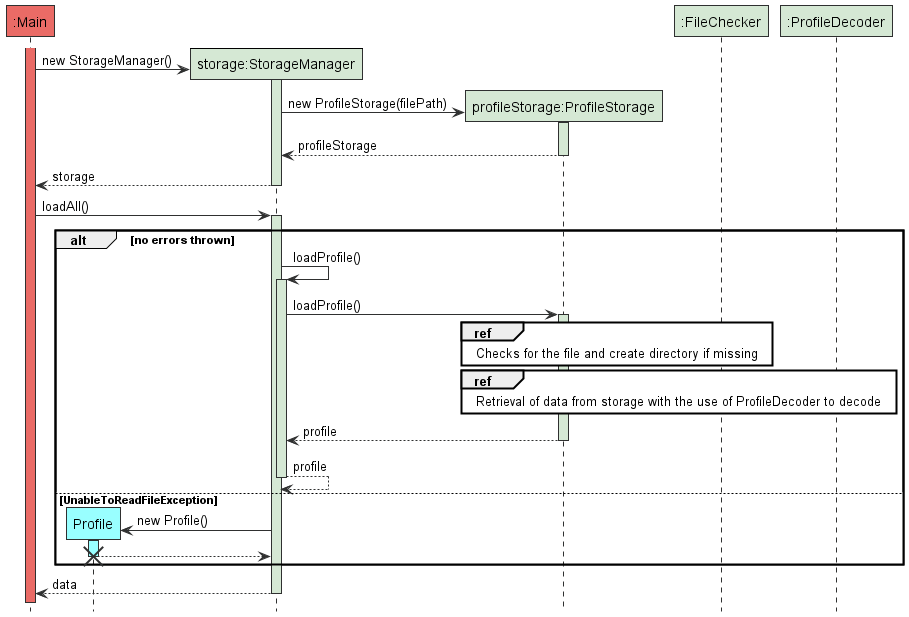
Upon successful launch of the application, Main will call to initialize StorageManager.
This in turn initializes all the subclasses of Storage, including ProfileStorage, with their respective file paths.
Afterwhich, Main calls a loading function loadAll that calls an internal loadProfile() function (self-invocation). This then calls the loadProfile() method of ProfileStorage.
ProfileStorage then does 2 main things:
- Checks and creates the file if it is missing.
- Retrieves the data from the file with the use of the ProfileDecoder to decode.
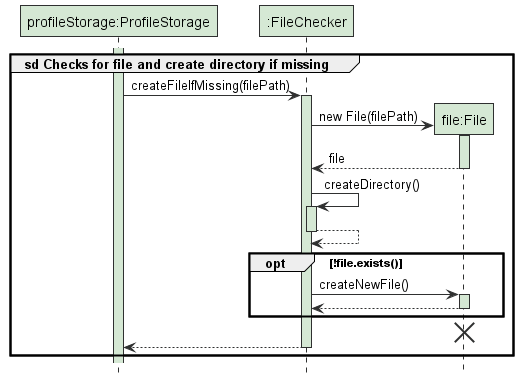
Reference Diagram: Checks for the file and create directory if it does not exist
The diagram above explains how the application checks if a file exists. If it exists, it will not perform any additional functionality. Otherwise, it will generate a new file in preparation for storage.
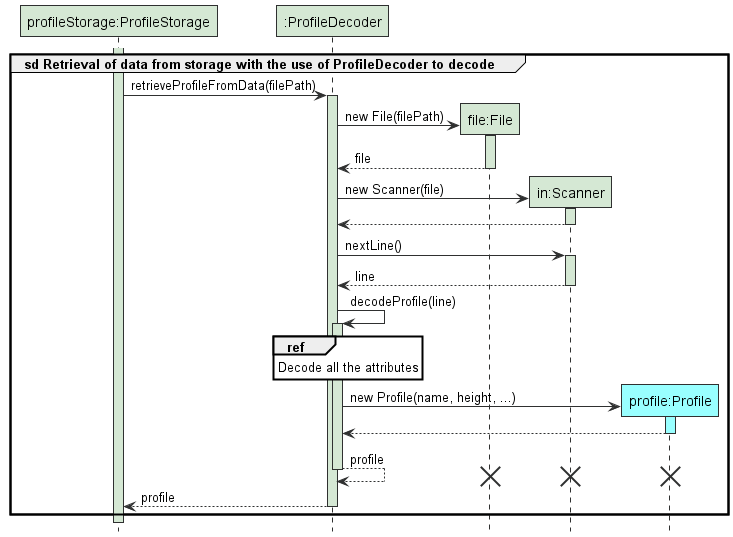
Reference Diagram: Retrieval of data from storage with the use of ProfileDecoder to decode
The diagram above explains the processes to decode the items from the file.
Upon reaching the decodeProfile(line) method, the reference frame depicts a process of decoding its attributes one by one to ensure that they are able to detect each attribute’s readability from storage.
If the methods are unable to read the respective attribute from storage, an invalid attribute will be initialized. This then returns an initialized profile with invalid attributes for StartState to catch, allowing users to change
their attributes instead of losing their entire profile data on startup.
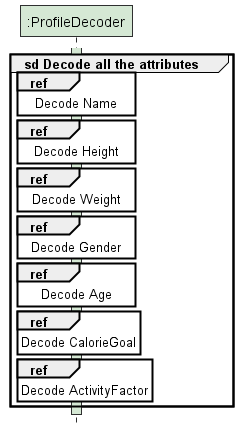
Reference Diagram: Decode all attributes
Below represents each of the attribute’s decoding process:
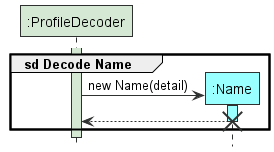
Reference Diagram: Decode Name
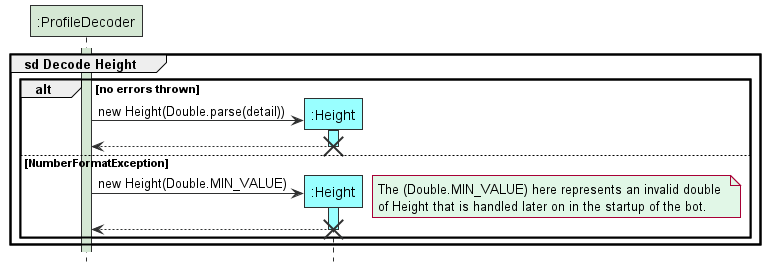
Reference Diagram: Decode Height
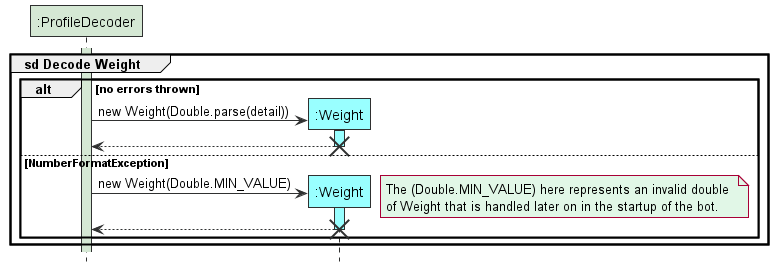
Reference Diagram: Decode Weight
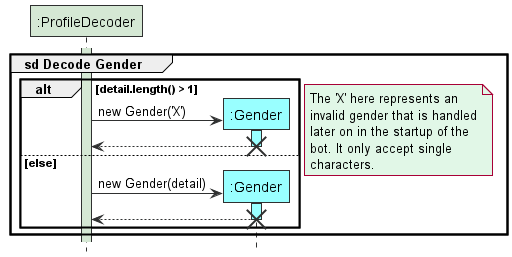
Reference Diagram: Decode Gender
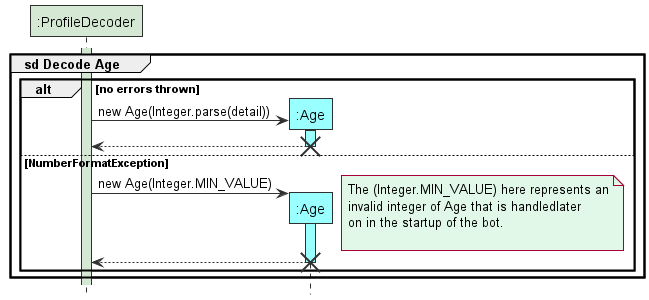
Reference Diagram: Decode Age
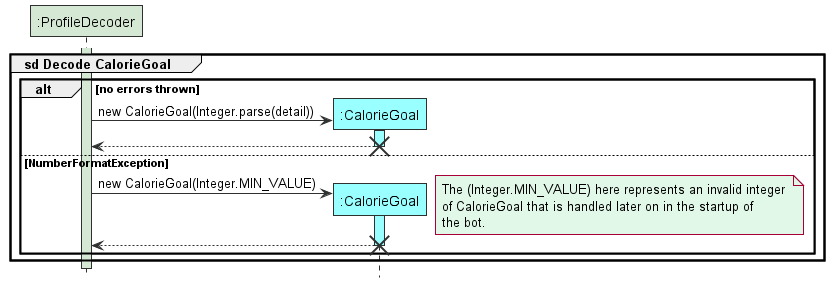
Reference Diagram: Decode CalorieGoal
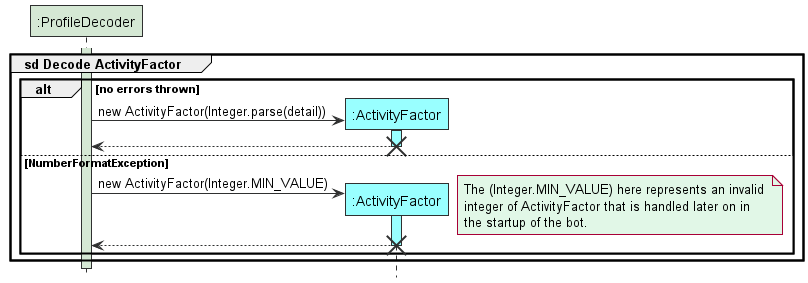
Reference Diagram: Decode ActivityFactor
The other storages load in a similar fashion to this, except for each decoder, they decode Item for ItemBanks, Food for FoodList and Exercise for ExerciseList.
Create Profile If Not Exist On Startup
When user first enters Fitbot, the profile of the user is not set up (attributes may not exist). If user were to
interact with the application, there might be incorrect output,
therefore the checkAndCreateProfile() is implemented to check whether the profile exist
and if it does not exist, Fitbot will guide user through to fill up the profile attributes.
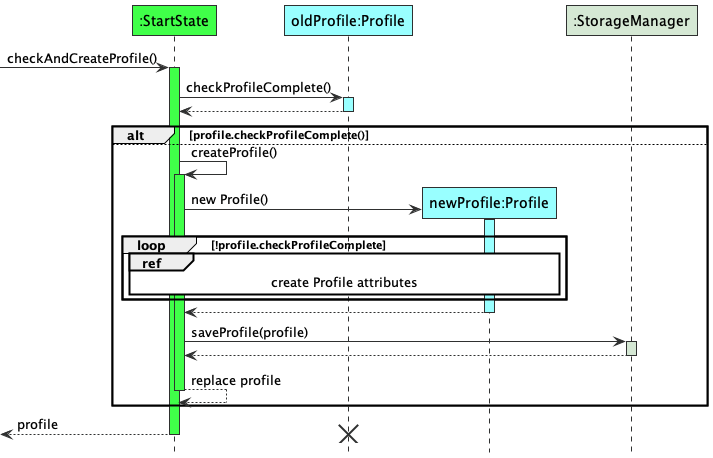
On startup, the main function will run checkAndCreateProfile() (not in diagram), which will cause StartState
instance to be created by dataManager and run new StartState.checkAndCreateProfile().
Step 1: the checkAndCreateProfile() will check if there is a profile exist, by checking all the attributes.
If all attributes are correct, the profile will be returned. If there is all the attributes are incorrect or there is no
attribute in storage, the StartState will self invocate by calling createProfile().
Step 2: createProfile() will instantiate a new profile instance. Using a while loop to check whether all attributes
have been updated, the createProfile() will ensure that all attributes in the new profile instance are valid before
proceeding to next step.
Step 3: Once all the profile attributes are set up, it will store the profile attributes into storage, by calling
saveProfile() in StorageManager class.
Step 4: The StartState will replace the reference of old profile instance with the new profile instance (not shown in diagram). Since the old profile instance is being dereferenced, it has reached the end of the lifeline, shown by a cross at its lifeline. The profile in the StartState will then be returned to the dataManager.
Design Considerations
The purpose of replacing the new profile with the old profile is to ensure that if the new user decides to close the program without finishing creating profile, the profile attributes keyed in by the user will not be saved. It will only save all the profile attributes when all the attributes has been inputted by the user are present and valid.
Product scope
Target user profile
University students who are looking to keep track of their calorie consumption and calorie outputs.
Value proposition
During these restricted COVID-19 times, we are confined to home-based learning. As a result, we tend to be less active and have fewer opportunities to stay active. This app aims to help you to gain or lose weight based on your goal of implementing a calorie deficit or calorie surplus.
Its overview shows your progress over the weeks, indicating whether or not you have hit your daily calorie goal target for the past 7 days.
User Stories
| Version | As a … | I want to … | So that I can … |
|---|---|---|---|
| v1.0 | new user | see usage instructions | refer to them when I forget how to use the application |
| v1.0 | new user | want to store food records | track my food intake |
| v1.0 | new user | want to store exercise records | track my exercises |
| v1.0 | new user | delete exercise records | amend wrong inputs |
| v1.0 | new user | delete food records | amend wrong inputs |
| v1.0 | new user | to see how close or how far i am from the calorie target | so that I could manage my calorie input |
| v1.0 | new user | save my profile data | reduce the hassle of typing repeatedly upon application startup |
| v1.0 | new user | calculate BMI | gauge whether I am in the healthy range |
| v1.0 | new user | store all records | refer to them whenever needed |
| v2.0 | new user | have a profile | to keep track of all information to calculate my net calories |
| v2.0 | user | find a to-do item by name | locate a to-do without having to go through the entire list |
| v2.0 | user | set up profile first before entering application | so that a more accurate analysis could be done |
| v2.0 | user | have a summary | see my calorie targets |
| v2.0 | user | have a history | spend less time typing all the requirements to store items |
| v2.0 | user | have an exercise list that update itself | have more time for exercises |
| v2.0 | user | have a sorted food list | see what I have eaten on different times of the day |
| v2.0 | user | have varying inputs methods | reduce unnecessary hassle |
| v2.0 | user | have a delete all command | start afresh |
| v2.0 | user | have sorted food list | view the meals I have eaten throughout the week |
| v2.0 | user | have sorted food list by meal time | track the number of supper meals I have in a week |
| v2.0 | frequent user | have the ability to edit past records | edit past wrong inputs |
| v2.0 | university student | be able to store weekly recurring sports activities | reduce hassle of input entries |
| v2.0 | body-conscious user | calculate net calories inclusive of BMR | have a more accurate gauge of calories burnt |
Non-Functional Requirements
- Should work on any OS as long as it has Java 11 or above installed on their PC.
- Should be able to hold up to at least a year of data without a slowdown of performance in daily use.
- Any user that is comfortable with typing of speeds >55 words per minute would be able to accomplish these tasks faster than if they used a mouse to navigate.
Glossary
self invocation
In UML sequence diagram, a method that does a calling to another of its own methods is called self-invocation.
array list
A linear data structure that inherits Java List implementation and Array implementation. It behaves like a normal array,
except that it is resizable. Moreover, the amount of time taken for reallocation the elements when capacity grows is a constant
time. In Java, array list can be implemented using ArrayList in Collection.
priority queue
An abstract data type similar to a regular queue or stack data structure in which elements in priority queue are ordered
and have “priority” associated with each element. The priority can be defined by the coder. In the case of FoodList, the
priority will be defined as earlier date and time will have higher priority.
min heap
The implementation of min heap is almost the same as priority queue, in which it is sorted according to some “priority” constraint. In addition, a min heap can be modelled as a binary tree structure having all the parent nodes smaller or equal to its children nodes.
tree map
A tree map is a combination of tree structure and hash map structure. In Java, tree map is implemented using a self-balancing
Red-Black tree structure and it is sorted according
to the natural order of its keys. In the case of ItemBank, the key should be the String type of the Item description,
which will be sorted lexicographically.
(more coming in the future…)
Instructions for manual testing
Given below are some instructions that can be used to test the application manually.
Launch
- Initial launch
- Prerequisite: There is no Fitbot.jar file on your desktop.
- Test case:
- Download the jar file and copy into an empty folder
- Go to your command prompt, and go into your directory.
- Run the command
java -jar Fitbot.jar.
Expected: a data folder will be created in the file that contain Fitbot.jar.
Setting Up Profile
- Setting Up Profile I
- Prerequisite: Fitbot.jar is in a folder with or without data folder.
- Test case:
- Delete profile.txt from data folder if present.
- Run Fitbot using
java -jar Fitbot.jar.
Expected: Fitbot will prompt for your name upon start up.
- Setting Up Profile II
- Prerequisite: profile.txt is present.
- Test case:
- Change 1 of the attribute to an invalid attribute.
- Run Fitbot using
java -jar Fitbot.jar.
Expected: Fitbot will prompt for the attribute missing.
- Setting Up Profile III
- Prerequisite: profile.txt is deleted/ not present.
- Test case:
- When being asked to type a name, type the command
bye.
Expected: A question shows up to confirm with the user whether the user wants to exit the program or wants to set his or her name as “bye”. The user then need to type 1 to exit the program, 2 to set the name as “bye” and any other key to go back. - Restart the program, checks whether profile.txt is deleted/ not present.
- Fill in some of the profile attributes. Do not fill up all of them.
- Type the command
bye.
Expected: Fitbot is able to exit.
- When being asked to type a name, type the command
Customising Profile
- Viewing current profile:
- Prerequisite: Have an initialized profile after the startup of the program
- Test case:
profile
Expected: Displays your profile in a viewable format
- Changing attributes:
- Prerequisite: Have an initialized profile after the startup of the program
- Test case:
profile n/John|
Expected: Name is not changed as the use of|character is illegal. - Test case:
profile n/John/
Expected: Name is not changed as the use of/character is also illegal. - Test case:
profile h/-20
Expected: An error message shows that you can only input a number between 1 and 300, and height will not change. - Test case:
profile w/-200
Expected: An error message shows that you can only input a number between 1 and 300, and weight will not change. - Test case:
profile a/170
Expected: An error message shows that you can only input a whole number between 10 and 150. - Test case:
profile s/mfe
Expected: Error message displays that you should only use ‘M’ or ‘F’ only. - Test case:
profile g/20000
Expected: Error message that displays that you can only input from -3000 to 10000. - Test case:
profile x/0
Expected: Error message asking you to try a whole number from 1 to 5 instead. - Test case:
profile x/2 w/90 h/190 a/22 s/m g/500 n/Johnny English
Expected: Profile will change even with the parameters not being in order. This allows users flexibility to change their attributes in any order and with whichever parameters they want. (At least 1 attribute and at max 7 attributes can be changed at once)
Recording Food Items:
- Adding a new Food Item when the Food List is empty:
- Prerequisite: Checks if the food list is empty using
view f/. An output message showing that the current food list is empty is expected. - Test case:
add f/chicken rice c/607
Expected: New Food Item is added to the Food List. A message telling the user that a new food item has been added will show up. The date and time are the date and time when the user call this command. - Test case:
add f/chicken rice c/607 d/x t/1200(where x is a date in DD-MM-YYYY format and within 7 days of today)
Expected: No Food Item is added to the Food List. A message will show up and tell the user that the date must be within 7 days of today.
- Prerequisite: Checks if the food list is empty using
- Viewing a new Food Item:
- Test case:
view f/when the Food List is empty
Expected: No food item shown. A message will show up, telling the user that there is no food items within 7 days of today. - Test case:
view f/after callingadd f/chicken rice c/607
Expected: The output will show the food list with at least one food item chicken rice, with calorie 607 cal and the date and time is when the user called theaddcommand.
- Test case:
- Deleting Food Item:
- Prerequisite: Simply replace the date to any date that is within 7 days of today date. The time field is also optional and can be replaced with any valid timing.
- Test case:
delete f/1 d/x t/1400when the Food List is empty (where x is a date in DD-MM-YYYY format and within 7 days of today)
Expected: No food item is deleted. The output will show a message telling the user that the Food List is empty. - Test case:
delete f/1 d/x t/1400after callingadd f/chicken rice c/607 d/x t/1400(where x is a date in DD-MM-YYYY format and within 7 days of today)
Expected: The food item with index 1 is removed. The output will show a message teling the user that the food item is deleted. (Note that the food item will bechicken riceif there is only one food in the food list) - Test case:
delete f/-1 d/x t/1400(where x is a date in DD-MM-YYYY format and within 7 days of today)
Expected: No food item is deleted. The output will show a message telling the user that the input index should be a number that is greater than 0. - Test case:
delete f/all
Expected: All Food Items in the Food List are deleted. Message will show up and inform the user that all food items in the Food List are deleted.
Recording Exercise Items
- Adding Exercise Items
- Prerequisite: View the current Exercise List using
view e/. - Test case:
add e/running c/200
Expected: A new Exercise Item is added to the Exercise List. Details of the added exercise are shown. The date of the exercise is the date when the user calls this command. - Test case:
add e/running c/200 d/x(where x is a date in DD-MM-YYYY format and within the past 7 days of today)
Expected: A new Exercise Item is added to the Exercise List. Details of the added exercise are shown. The date of the exercise is the date that the user input. - Test case:
add e/running c/200 d/x(where x is a date in DD-MM-YYYY format and more than 7 days ago)
Expected: No Exercise Item is added to the Exercise List. Error message will show up and inform the user that a valid date within 7 days of today is required.
- Prerequisite: View the current Exercise List using
- Viewing Exercise Items
- Test case:
view e/when the Exercise List is empty
Expected: Message indicating that the Exercise List is empty is shown. - Test case:
view e/when the Exercise List is not empty
Expected: All of the Exercise Items are displayed.
- Test case:
- Deleting Exercise Items
- Prerequisite: View the current Exercise List using
view e/. - Test case:
delete e/1 d/xwhen the Exercise List is empty (where x is a date in DD-MM-YYYY format and within 7 days of today)
Expected: No Exercise Item is deleted from the Exercise List. Error message will show up and inform the user that the Exercise List is empty. - Test case:
delete e/1 d/xwhen the Exercise List contains at least one exercise with date x (where x is a date in DD-MM-YYYY format)
Expected: The Exercise Item with index 1 is deleted. Details of the deleted exercise are shown. - Test case:
delete e/2 d/xwhen the Exercise List contains only one exercise with date x (where x is a date in DD-MM-YYYY format)
Expected: No Exercise Item is deleted from the Exercise List. Error message will show up and inform the user that the Exercise Item with index 2 on date x is not found in the Exercise List. - Test case:
delete e/all
Expected: All Exercise Item in the Exercise List are deleted. Message will show up and inform the user that all exercises in the Exercise List are deleted.
- Prerequisite: View the current Exercise List using
Scheduling Exercises
- Adding Upcoming Exercise Items
- Prerequisite: View the current Upcoming Exercise List using
view u/. - Test case:
add e/running c/200 d/x(where x is a date in DD-MM-YYYY format and one year within the future)
Expected: A new Upcoming Exercise Item is added to the Upcoming Exercise List. Details of the added upcoming exercise are shown. - Test case:
add e/running c/200 d/x(where x is a date in DD-MM-YYYY format and more than one year in the future)
Expected: No Upcoming Exercise Item is added to the Upcoming Exercise List. Error message will show up and inform the user that a valid future date within one year from today is required.
- Prerequisite: View the current Upcoming Exercise List using
- Adding Recurring Exercise Items
- Prerequisite: View the current Upcoming Exercise List using
view u/. - Test case:
add r/running c/200 :/x -/y @/1,3when y occurs after x (where x and y are dates in DD-MM-YYYY format and both one year within the future)
Expected: Upcoming Exercise Items that occur on Monday and Wednesday (@/1,3) between date x and y are added to the Upcoming Exercise List. A message will show up, indicating that the recurring exercises have been added. - Test case:
add r/running c/200 :/x -/y @/1,3when x occurs after y (where x and y are dates in DD-MM-YYYY format)
Expected: No Upcoming Exercise Item is added to the Upcoming Exercise List. Error message will show up and inform the user that y should occur after x. - Test case:
add r/running c/200 :/x -/y @/1,3when y occurs after x (where x and y are dates in DD-MM-YYYY format and one or more of them are more than one year in the future)
Expected: No Upcoming Exercise Item is added to the Upcoming Exercise List. Error message will show up and inform the user that both x and y should be within one year in the future. - Test case: add r/running c/200 :/x -/y @/1,3 (where x and y are dates in DD-MM-YYYY format and one or more of them are in the past)
Expected: No Upcoming Exercise Item is added to the Upcoming Exercise List. Error message will show up and inform the user that both x and y should be within one year in the future.
- Prerequisite: View the current Upcoming Exercise List using
- Viewing Upcoming Exercise Items
- Test case:
view u/when the Upcoming Exercise List is empty
Expected: Message indicating that the Upcoming Exercise List is empty is shown. - Test case:
view u/when the Upcoming Exercise List is not empty
Expected: All of the Upcoming Exercise Items are displayed.
- Test case:
- Editing Upcoming Exercise Items
- Prerequisite: View the current Upcoming Exercise List using
view u/. - Test case:
edit u/
Expected: No Upcoming Exercise Item is edited. Error message will show up and inform the user that there should be an input for item number. - Test case:
edit u/1
Expected: No Upcoming Exercise Item is edited. Error message will show up and inform the user that there should be an input for the details to be edited. - Test case:
edit u/1 n/runnningwhen the Upcoming Exercise List is empty
Expected: No Upcoming Exercise Item is edited. Error message will show up and inform the user that the Upcoming Exercise List is empty. - Test case:
edit u/1 n/runningwhen the Upcoming Exercise List is not empty
Expected: The name of the Upcoming Exercise List with index 1 in the Upcoming Exercise List is updated to ‘running’. Details of the newly updated Upcoming Exercise Item will be shown.
- Prerequisite: View the current Upcoming Exercise List using
- Deleting Upcoming Exercise Items
- Prerequisite: View the current Exercise List using
view u/. - Test case:
delete u/1when the Exercise List is empty
Expected: No Upcoming Exercise Item is deleted from the Upcoming Exercise List. Error message will show up and inform the user that the Upcoming Exercise List is empty. - Test case:
delete u/1when the Upcoming Exercise List contains at least one upcoming exercise
Expected: The Upcoming Exercise Item with index 1 is deleted. Details of the deleted upcoming exercise are shown. - Test case:
delete u/1,2,3when the Exercise List contains three or more upcoming exercises
Expected: The Upcoming Exercise Items with index 1, 2, 3 are deleted. Details of all the deleted upcoming exercises are shown. - Test case:
delete u/all
Expected: All Upcoming Exercise Items in the Upcoming Exercise List are deleted. Message will show up and inform the user that all upcoming exercises in the Upcoming Exercise List are deleted.
- Prerequisite: View the current Exercise List using
Building Food Bank
- Adding Food Bank Items
- Prerequisite: Food Bank does not contain a Food Item with the name “potato”.
- Test case:
add fbank/potato
Expected: Error as the item’s calorie details were not provided. - Test case:
add fbank/potato c/250
Expected: Food Item with name ‘potato’ and calories ‘250’ has been added to Food Bank. - Test case:
add f/potato
Expected: Food Item with name ‘potato’ and calories ‘250’ has been added to Food List. User no longer has to provide the calorie details for ‘potato’ as it can be retrieved from the Food Bank. - Test case:
add fbank/potato c/300
Expected: Error as the name “potato” already exists in the Food Bank, and all names in the Food Bank need to be unique.
- Viewing Food Bank Items
- Test case:
view fbank/
Expected: Shows the list of Food Items in the Food Bank. - Test case:
view fbank/a
Expected: Invalid format. The command wordviewmust be followed byfbank/exactly.
- Test case:
- Editing Food Bank Items
- Prerequisite: Food Bank contains at least one Item. To find the index of the Item you want to edit, use
view fbank/. - Test case:
edit fbank/
Expected: Error as there is no input for item number. - Test case:
edit fbank/1
Expected: Error as you need to specify what to edit about this Item. - Test case:
edit fbank/1 n/tomato
Expected: Item number 1 in the Food Bank has been changed to ‘tomato’ (provided that you do not already have an Item named ‘tomato’ in the Food Bank).
- Prerequisite: Food Bank contains at least one Item. To find the index of the Item you want to edit, use
- Deleting Food Bank Items
- Prerequisite: Food Bank contains at least 3 Items. To find the index of the Item you want to delete, use
view fbank/. - Test case:
delete fbank/1,2
Expected: Food Bank Items 1 and 2 have been deleted. - Test case:
delete fbank/1
Expected: Food Bank Item 1 has been deleted. - Test case:
delete fbank/x, where x is any number bigger than the size of the list.
Expected: Error as x is out of the range of the item list. - Test case:
delete fbank/all
Expected: All items in the Food Bank have been deleted.
- Prerequisite: Food Bank contains at least 3 Items. To find the index of the Item you want to delete, use
Building Exercise Bank
- Adding Exercise Bank Items
- Prerequisite: Exercise Bank does not contain a Exercise Item with the name “30 mins jogging”.
- Test case:
add ebank/30 mins jogging
Expected: Error as the item’s calorie details were not provided. - Test case:
add ebank/30 mins jogging c/500
Expected: Exercise Item with name ‘30 mins jogging’ and calories ‘500’ has been added to Exercise Bank. - Test case:
add e/30 Mins Jogging
Expected: Exercise Item with name ‘30 Mins Jogging’ and calories ‘500’ has been added to Food List. User no longer has to provide the calorie details for ‘30 Mins Jogging’ as it can be retrieved from the Exercise Bank, since the match for item name in the Item Banks is case-insensitive. - Test case:
add ebank/30 mins jogging c/300
Expected: Error as the name “30 mins jogging” already exists in the Exercise Bank, and all names in the Exercise Bank need to be unique.
- Viewing Exercise Bank Items
- Test case:
view ebank/
Expected: Shows the list of Exercise Items in the Exercise Bank. - Test case:
view ebank/a
Expected: Invalid format. The command wordviewmust be followed byebank/exactly.
- Test case:
- Editing Exercise Bank Items
- Prerequisite: Exercise Bank contains at least one Item. To find the index of the Item you want to edit, use
view ebank/. - Test case:
edit ebank/
Expected: Error as there is no input for item number. - Test case:
edit ebank/1
Expected: Error as you need to specify what to edit about this Item. - Test case:
edit ebank/1 n/cycling
Expected: Item number 1 in the Exercise Bank has been changed to ‘cycling’ (provided that you do not already have an Item named ‘cycling’ in the Exercise Bank).
- Prerequisite: Exercise Bank contains at least one Item. To find the index of the Item you want to edit, use
- Deleting Exercise Bank Items
- Prerequisite: Exercise Bank contains at least 3 Items. To find the index of the Item you want to delete, use
view ebank/. - Test case:
delete ebank/1,2
Expected: Exercise Bank Items 1 and 2 have been deleted. - Test case:
delete ebank/1
Expected: Exercise Bank Item 1 has been deleted. - Test case:
delete ebank/x, where x is any number bigger than the size of the list.
Expected: Error as x is out of the range of the item list. - Test case:
delete ebank/all
Expected: All items in the Exercise Bank have been deleted.
- Prerequisite: Exercise Bank contains at least 3 Items. To find the index of the Item you want to delete, use
Exiting Program
- Exiting Program at any time
- Prerequisite: Ensures that Fitbot is still running.
- Test case:
bye
Expected: A goodbye message will show up, and the program is terminated successfully.
Manipulating and Saving Data
- Manipulating Profile data in the text files directly.
- Prerequisite: Data folder with profile.txt already present. (You have run through the profile creation at least once)
- Procecures:
- Navigate to the
/datafolder which is in the same directory as your Fitbot.jar) Open the profile.txt with your editor of choice and view the attributes. It should look something like this:
john|180.0|65.0|M|22|300|2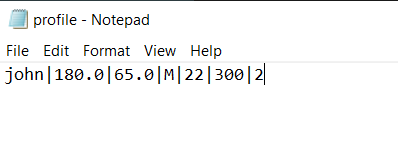
Edit the height attribute to reflect this:
john|BUG|65.0|M|22|300|2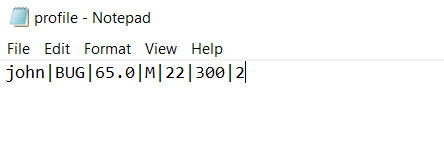
- Save the file and try to relaunch the application.
- Expected: The application should detect the height is invalid and prompts you to change its value inside the application
- Manipulating saved text files, leading to invalid line.
- Causes of invalid lines in storage: Invalid number of delimiters present, unrecognizable texts and empty spaces (eg.
E|run|309, where the date field is not present)
- Causes of invalid lines in storage: Invalid number of delimiters present, unrecognizable texts and empty spaces (eg.
-
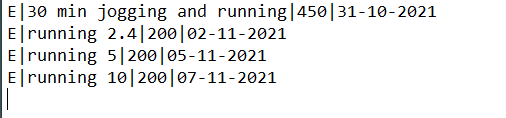
Prerequisite: Data folder is present with items already added to lists. (We will be using exercise_list.txt as an example.)
Your exercise_list.txt should look something like this:
- Procecures:
Change one of the lines generated by the application with
invalid line.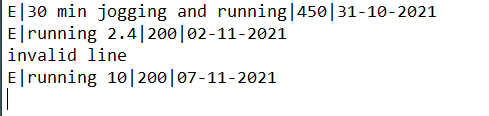
- Launch the application where it should be able to detect the invalid line in storage.
- Expected: The user will be notified of the invalid line and it will be subsequently ignored. Upon the next operation that requires saving of data ("bye", "add e/" commands etc.), this invalid line will be overwritten and ignored, preserving the data integrity of the rest of the lines.
Note: The dates used here was during the creation of the DeveloperGuide. We have set hard limits to not accept anything past 10 years prior or greater than 1 year into the future for completeness of our data. For instance, you are unable to set a exercise performed in 1991 as it will just ignore the line without notifying the user.